OAuth 2.1 explained
Need to secure access to APIs for web, native or browser-based applications? The upgraded OAuth 2.1 synthesises 8 years of experience with the original OAuth 2.0 for a simpler, safer and more streamlined authorisation framework.
1. Upgraded token-based security with OAuth 2.1

The token is a popular mechanism for securing access and OAuth 2.0, published in 2012 as RFC 6749, established itself as the standard framework for issuing tokens to applications that need some authorised access.
The world did not stand still in the years that followed the RFC 6749 publication. Originally designed for the needs of the social network, developers sought to put the framework to use in areas such as fintech, healthcare, enterprise IT and IoT. The landscape of the security requirements also shifted with that, but also in response to new security threats and concerns. To address those evolving needs the community devised over a dozen additional documents for OAuth 2.0 extensions and best practises.
Navigating this growing mesh of specs became increasingly complex, so in 2019 the OAuth working group decided to establish a new baseline for minimal security and interoperability in the OAuth authorisation framework, and version it 2.1.
OAuth 2.1 doesn’t introduce any new features. What it does is roll into one clear document several key OAuth 2.0 RFCs that establish this new baseline for security and interoperability. OAuth 2.0 stuff which has weaknesses and should no longer be used is left out, such as the implicit flow for browser-based apps which worked around browsers’ inability in 2012 to support cross-origin requests, now made possible with CORS.
The OAuth 2.1 spec is still a work in progress at the time of writing this, but nevertheless complete and immediately useful. Significant changes are not expected. You can find the latest draft here.
2. The four roles in OAuth

The four roles defined in OAuth 2.0 remain unchanged. They foster clean separation of concerns. A dedicated authorisation server takes care of the token minting and enforcing policies. This makes it possible to roll out OAuth applications and services quickly and with consistent security properties.

Resource owner The end-user. The term reflects OAuth's original purpose, giving 3rd party software access on a user's behalf. Other scenarios are also possible. |
Resource server The protected asset, typically a web API, which requires a token to be accessed. The token validation logic aims to be minimal and can also be stateless. |

Client The application -- web, mobile, desktop, or device-based, that needs to obtain a token to access the resource server. The client-side OAuth logic is intended to be simple and minimal. |

Authorisation server Dedicated server for issuing access tokens to the client, after authenticating the end-user and obtaining authorisation, from the end-user or based on some policy. |
3. How can a client obtain a token?

In order to obtain an access token the client needs to present a valid authorisation grant (we can call that a credential) to the authorisation server. The steps to obtain the token follow a grant-specific protocol.
3.1 The core grants in OAuth 2.1
OAuth 2.1 reduces the core authorisation grants to two (plus the refresh token grant).
Whenever the authorisation involves user interaction, regardless of the application type (web, native or SPA), the authorisation code grant is used, which now must always be protected with PKCE. The implicit and password grants are thus deprecated in OAuth 2.1.
Clients acting on their own behalf (services) continue to obtain tokens via the client credentials grant.
| Grant type | Client type / Use case |
|---|---|
| Authorisation code | Intended for web, native and browser-based applications where the client sends the user to the authorisation server to allow (or deny) the request. The user authorisation is captured in a code which the client can exchange for an access token by calling the authorisation server again, this time directly. The code grant requires a user agent, such as a web browser, and thus enables authorisation servers to implement single sign-on via browser session cookies. |
| Client credentials | For clients, such as web services, acting on their own behalf. |
| Refresh token | A special grant to let clients obtain a new access token without having to send the user to the authorisation server for a new authorisation code grant. |
3.2 Extension grants
All extension OAuth 2.0 grants, such as those listed below, remain usable in OAuth 2.1.
| Grant type | Client type / Use case |
|---|---|
| SAML 2.0 bearer | Lets a client in possession of a SAML 2.0 assertion (sign-in token) exchange it for an OAuth access token. |
| JWT bearer | Lets a client in possession of a JSON Web Token (JWT) assertion issued from one security domain exchange it for an OAuth access token valid in another domain. |
| Device | For devices without a browser or with constrained input, such as a smart TV, media console, printer, etc. |
| Token exchange | Lets applications and services obtain an access token in delegation and impersonation scenarios. |
3.3 Obsolete grants
The following grants from OAuth 2.0 should no longer be used. Deployments with implicit should consider switching to the code grant.
| Grant type | Client type / Use case |
|---|---|
| Implicit | Intended for browser-based (JavaScript) applications without a backend. |
| Password | For trusted native clients where the application and the authorisation server belong to the same entity. |
4. Authorisation code flow example

We will now go through an example of a client obtaining an access token from an authorisation server using the authorisation code grant.
The client needs to perform two steps to obtain the token: the first to get the user’s authorisation (represented by an opaque code), the second to exchange the code for the actual token. That’s why this series of steps is also called the code flow.
A web application gets the user’s authorisation (as code) by sending the browser to the authorisation server. A mobile or desktop application will invoke the system browser with the same URL, or some other configured app acting as trusted agent.
If a code is successfully obtained the client calls the OAuth server again, this time directly, to exchange the code for an access token (and an optional refresh token).
| Step 1 | Step 2 | |
|---|---|---|
| Purpose |
|
|
| Request | Front-channel (browser redirection) |
Back-channel (client to authorisation server) |
| Server endpoint | Authorisation endpoint | Token endpoint |
| On success | Authorisation code (step 2 input) |
Access token Refresh token (optional) |
Code grant: Step 1
The client initiates the code flow by sending the browser to the authorisation endpoint of the server with an authorisation request.
Example GET request to the authorisation server:
GET /login?
 response_type=code
 &client_id=xahnosh1
 &scope=myapi-read%20myapi-write
 &redirect_uri=https%3A%2F%2Fclient.example.org%2Fcb
 &state=ahroh3feiThi
 &code_challenge=6fdkQaPm51l13DSukcAH3Mdx7_ntecHYd1vi3n0hMZY
 &code_challenge_method=S256 HTTP/1.1
Host: https://c2id.com
The authorisation request parameters are encoded in the query string:
-
response_type – Set to
code. -
client_id – Identifies the client at the authorisation server. The client_id is assigned when the client is registered with the authorisation server, via the client registration API, a developer console, or some other method.
-
scope – Specifies the scope of the requested token, as a list of one or more strings recognised by the resource server and the authorisation server. If omitted the authorisation server may assume some default scope. The example sets the scope to the values
myapi-readandmyapi-write. -
redirect_uri – Absolute callback URL controlled by the client to which the authorisation parameters should be passed, typically with a 302 or 303 HTTP redirection. If omitted the authorisation server will assume the default registered redirection URI for the client. The callback URL in the example is
https://client.example.org/cb. -
state – Optional opaque value set by the client which the authorisation server will echo verbatim in the authorisation response. Enables the client to encode application state information to appear at the redirect_uri.
-
code_challenge – The BASE64URL-encoded SHA-256 hash of a random 32 bytes called code verifier which the client must generate and store internally and which is intended to prevent code injection and CSRF attacks. Originally specified in the PKCE extension (RFC 7336) to OAuth 2.0.
-
code_challenge_method – Set to
S256to indicate that SHA-256 hashing is used to transform the code verifier.
The authorisation request can include other parameters defined by OAuth 2.0 extensions, such as resource indicators.
What happens at the authorisation server when the user is sent there?
-
The server will check the validity of the request. If the client_id or the redirect_uri are found to be invalid the identity of the client cannot be established and all further processing of the request will stop. Other error conditions will be reported at the redirect_uri with an error code and optional description.
-
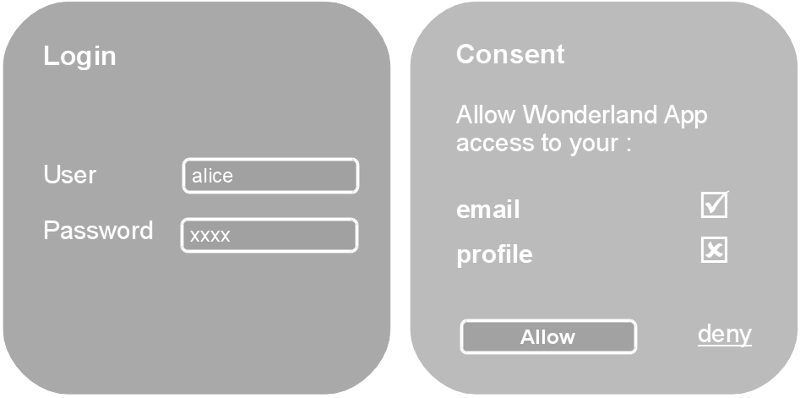
The user will get authenticated, by checking if they have a valid session from a previous visit (established by a session cookie), and in the absence of such as session will be asked to login.
-
The user will be asked to authorise the client and the requested scope values (
myapi-read,myapi-write). The user can allow the entire request, only a subset of the requested scope values, or deny the whole request.
After the user interaction the authorisation server will then call the client redirect_uri with an authorisation code (on success) or an error (if access was denied, or some other error occurred, unless the error must not result in a redirection due to an invalid client identity).
Example successful authorisation response using an HTTP 302 redirection:
HTTP/1.1 302 Found
Location: https://client.example.org/cb?
 code=UghaeQuiBahjohkifie3Zi9queetohf0
 &state=ahroh3feiThi
Example authorisation error response with the access_denied error code:
HTTP/1.1 302 Found
Location: https://client.example.org/cb?
 error=access_denied
 &state=ahroh3feiThi
On success the client must use the returned code to proceed to the next step - exchanging the code for the access token.
On error the client should log the returned error code and display a meaningful message to the user.
Code grant: Step 2
The authorisation code is an intermediate credential, which encodes the authorisation obtained at step 1. It is therefore opaque to the client and has meaning only to the authorisation server.
To get its access token the client must submit the code to the authorisation server, but this time with a direct back-channel request. This is done for two crucial reasons:
-
For a client which has a credential, such a private key, to let it authenticate before revealing the token to it.
-
To deliver the token straight to the client, thus avoiding its direct exposure to the browser, proxies and server HTTP logs.
The code-for-token exchange happens at the token endpoint of the authorisation server.
Example access token request where the client authenticates with
private_key_jwt (explained later):
POST /token HTTP/1.1
Host: c2id.com
Content-Type: application/x-www-form-urlencoded

grant_type=authorization_code
 &code=UghaeQuiBahjohkifie3Zi9queetohf0
 &redirect_uri=https%3A%2F%2Fclient.example.org%2Fcb
 &code_verifier=3641a2d12d66101249cdf7a79c000c1f8c05d2aafcf14bf146497bed
 &client_id=xahnosh1
 &client_assertion_type=urn:ietf:params:oauth:client-assertion-type:jwt-bearer
 &client_assertion=eyJhbGciOiJSUzI1NiJ9.eyJzdWIiOiIxMjMiLCJhdWQiOiJodHRwczpcL1wvYzJpZC5jb21cL3Rva2VuIiwiaXNzIjoiMTIzIiwiZXhwIjoxNTk2NTY3ODYzLCJqdGkiOiJNWjROejhEZ05sSmU2RnVMM09NVHludEVmdl9jV2hlNVJsZmZsU2JFTW1ZIn0.edpOg4xauH8SQQ5KxFqfn7DqjaZnX8a6vVTtEOTBmwtUuLRTiJvaEUDTEhaXOvzFnpp0ymagk30Ju1JLrhKkBGlXN0Id0ouIAH12zDAlb-UH1TsTcb_sKSShptprVyw7_gK9zd0UdOepMazThoSYoZdvPzJoKrW9NsRDFlMPJ20NJbHU2ILVtZliS0zc0A1iyPshqwd99qzltVVoF6qpERslb6epS8c3eER6qOL8KOq3BDdSDYg4knrio70jilU1fDENoa6eMvexCzQTlIKKCprMV1nEXOm_Y1X6jARfScJiVY07WLbzcMtC0E3bpOmmjtbfcc0FdUhNEPK3Eou7_Q]
The token request parameters are form-encoded:
-
grant_type – Set to
authorization_code. -
code – The code obtained from step 1.
-
redirect_uri – Repeats the callback URL from step 1.
-
code_verifier – The code verifier used to create the code_challenge in step 1. The authorisation server is going to apply the same SHA-256 hash to the value and compare the result with the code_challenge received at step 1 before clearing the token request.
The request can include other parameters, for example parameters required for
the client authentication. For the private_key_jwt authentication these are
client_id, client_assertion_type and client_assertion.
Example access token request for a public client without credentials - note that only the client_id is supplied here and there are no authentication parameters:
POST /token HTTP/1.1
Host: c2id.com
Content-Type: application/x-www-form-urlencoded

grant_type=authorization_code
 &code=UghaeQuiBahjohkifie3Zi9queetohf0
 &redirect_uri=https%3A%2F%2Fclient.example.org%2Fcb
 &code_verifier=3641a2d12d66101249cdf7a79c000c1f8c05d2aafcf14bf146497bed
 &client_id=xahnosh1
What does the authorisation server do when receiving a token request?
-
Checks the client_id and if the client must authenticate with a particular method, such as
private_key_jwt, checks that too. -
Checks the code, redirect_uri and code_verifier validity.
On success the authorisation server will return a JSON object with the issued access token and metadata about it:
HTTP/1.1 200 OK
Content-Type: application/json
Cache-Control: no-store
Pragma: no-cache

{
  "token_type"   : "Bearer",
  "access_token" : "haiquuw3uf4ohfiushuHaiK6johXohgo",
  "expires_in"   : 900,
  "scope"        : "myapi-read myapi-write"
}
The Bearer token_type of the access_token is explained in the next chapter. The expires_in parameter informs the client for how many seconds the access token will be valid. The scope the actually granted authorisation, as some of the originally requested scope values may have been denied and others, not explicitly requested, granted.
Depending on the authorisation server policy for the client, the JSON object may include an optional refresh token.
HTTP/1.1 200 OK
Content-Type: application/json
Cache-Control: no-store
Pragma: no-cache

{
  "token_type"    : "Bearer",
  "access_token"  : "haiquuw3uf4ohfiushuHaiK6johXohgo",
  "expires_in"    : 900,
  "refresh_token" : "AezuoSeijaSaXohkai5ahqu9aeghaiyu",
  "scope"         : "myapi-read myapi-write"
}
The refresh token is a special grant which lets the client obtain a new access token from the authorisation server without having to send the user to the authorisation server, which will be a major inconvenience if done repeatedly.
Example refresh, by setting the grant_type to refresh_token, the client
authenticates again with private_key_jwt:
POST /token HTTP/1.1
Host: c2id.com
Content-Type: application/x-www-form-urlencoded

grant_type=refresh_token
 &refresh_token=AezuoSeijaSaXohkai5ahqu9aeghaiyu
 &client_id=xahnosh1
 &client_assertion_type=urn:ietf:params:oauth:client-assertion-type:jwt-bearer
 &client_assertion=eyJhbGciOiJSUzI1NiJ9.eyJzdWIiOiIxMjMiLCJhdWQiOiJodHRwczpcL1wvYzJpZC5jb21cL3Rva2VuIiwiaXNzIjoiMTIzIiwiZXhwIjoxNTk2NTY3ODYzLCJqdGkiOiJNWjROejhEZ05sSmU2RnVMM09NVHludEVmdl9jV2hlNVJsZmZsU2JFTW1ZIn0.edpOg4xauH8SQQ5KxFqfn7DqjaZnX8a6vVTtEOTBmwtUuLRTiJvaEUDTEhaXOvzFnpp0ymagk30Ju1JLrhKkBGlXN0Id0ouIAH12zDAlb-UH1TsTcb_sKSShptprVyw7_gK9zd0UdOepMazThoSYoZdvPzJoKrW9NsRDFlMPJ20NJbHU2ILVtZliS0zc0A1iyPshqwd99qzltVVoF6qpERslb6epS8c3eER6qOL8KOq3BDdSDYg4knrio70jilU1fDENoa6eMvexCzQTlIKKCprMV1nEXOm_Y1X6jARfScJiVY07WLbzcMtC0E3bpOmmjtbfcc0FdUhNEPK3Eou7_Q]
OAuth 2.1 ups the security of refresh tokens by requiring authorisation servers to rotate them on each issue or to bind them to a private key belonging to the client.
5. Using the access token

Accessing a web API with a token is super easy. The access tokens in OAuth 2.1 are commonly of type bearer, meaning the client just needs to include the token with each request.
Putting the token in the HTTP Authorization header is the recommended method:
GET /resource/v1 HTTP/1.1
Host: api.example.com
Authorization: Bearer haiquuw3uf4ohfiushuHaiK6johXohgo
Do not put the token in the request URL as this is likely to leak it into the logs of web servers and proxies!
If the resource server determines the token to be valid and not expired, it will proceed with servicing the request.
Else, it will return an appropriate error in a HTTP WWW-Authenticate response header.
Example error for an invalid or expired token:
HTTP/1.1 401 Unauthorized
WWW-Authenticate: Bearer realm="api.example.com",
                         error="invalid_token",
                         error_description="The access token is invalid or expired"
If the client receives an invalid_token error for an access token that used
to work, this is a signal that it must request a new one from the authorisation
server. How? With the refresh token (if one is available) or by sending the
user to authorisation server with a new request.
Keep in mind that the bearer nature of the token means whoever has possession of it can access the resource server. The bearer tokens must therefore be protected:
- First, by keeping the tokens in safe client-side storage.
- By submitting the tokens over TLS / HTTPS.
Issuing short-lived tokens can mitigate the potential risk of token leakage.
To fix the bearer weakness of access tokens authorisation servers and clients can implement the mTLS extension (for web and native applications) or the dPOP extension (for SPAs) which bind the token to a private key owned by the client. When an access token is bound to a private key, which can be kept in a secure HSM or device storage to prevent its extraction, the access token is unusable without the key. Applications that need higher security, such as in Open Banking, therefore require tokens to be mTLS secured.
6. How to secure a resource server with tokens?
To clear a submitted request the resource server needs to validate the token. The validation ensures the following:
- That the access token has been issued by the authorisation server.
- That the token hasn’t expired.
- Its scope covers the request.
How that’s done depends on the particular implementation of the access token, which is determined by the authorisation server. More on that in the next chapter.
The required token validation logic can be easily abstracted from the underlying resource, or retrofitted to an existing one, with the help of an API gateway or reverse HTTP proxy.
Most popular web servers and frameworks, such as Apache httpd and Spring, provide some sort of module for validating incoming requests secured with a bearer access token. Upon successful validation the underlying resource can be provided with selected token attributes, such as the end-user’s identity. This again is a matter of implementation.
7. A closer look at the access token

The OAuth framework doesn’t prescribe a particular embodiment for access tokens. This decision is left to implementors for a good reason: to clients the token is just an opaque string; their validation is a matter between the authorisation server and the resource server(s), and since they often belong to the same provider there hasn’t been much demand to specify a standard token format, until recently.
Fundamentally, there are two types of bearer token:
| Identifier-based | Self-contained |
|---|---|
| The token represents a hard-to-guess string which is a key to a record in the authorisation server's database. | The token encodes the entire authorisation in itself and is cryptographically protected against tampering. |
| A resource server validates the token by making a call to the authorisation server's introspection endpoint. | The JSON Web Token (JWT) has become the defacto standard for self-contained tokens. A new OAuth spec provides a sensible scheme for using JWTs for OAuth access tokens. |
|
Pros / cons of identifier-based tokens:
|
Pros / cons of self-contained tokens:
|
8. The authorisation server briefly explained
The authorisation server is responsible for issuing access tokens for protected resources under its control.
OAuth gives server implementers the freedom to determine how the users get authenticated and how the actual authorisation is obtained. The Connect2id server takes full advantage of this freedom and provides a flexible web API to plug in authentication factors, policies and logic to determine the issue of the tokens and their properties, such as scope.
8.1 Authenticating users
An authorisation server may for instance implement a combination of password and risk-based authentication, where a second factor, such as a FIDO device, is required when the client requests an access token for a sensitive resource or high-value transaction.
Delegation of the authentication to an external provider is possible, for example by presenting a choice of popular social logins.
After the user is authenticated the server typically creates a session so that subsequent requests don’t require the user to re-authenticate.
The user can be asked to re-authenticate if the fingerprint of their browser changes or if the token scope demands greater certainty that the legitimate user is present. This again is subject to concrete server policy.
8.2 Obtaining authorisation
As with the user authentication, OAuth lets server implementers decide how the user authorisation is obtained and what scope and other properties the issued access tokens receive.
Authorisation servers that issue tokens for accessing personal data and resources typically render a consent form where the user can decide which scopes to grant to the requesting application.
An enterprise authorisation server would typically consult a policy which takes into account the person’s status, role and entitlements to determine the token scope. The client’s trust level, e.g. internal application vs external application, can also be a factor in the authorisation.
8.3 Client authentication
OAuth 2.1 defines two types of clients, depending on their capability to authenticate with the authorisation server:
-
Confidential – A client with credentials which uniquely identify it with the server and which are kept confidential from the user and other entities. A web application which executes on a web server can be such a client.
-
Public – A clients without credentials. An application which executes on a mobile device or in a browser (SPA) is such a client.
Regardless of its type, a client must have a unique client_id assigned by the authorisation server.
The six methods for authenticating clients specified in OAuth 2.0 and its extensions continue to hold in OAuth 2.1. However, there is now a clear recommendation and preference for asymmetric key based authentication.
Shared client secrets (client_secret_basic, client_secret_post) have the downside that they must be stored by both client and server, which means there is more critical data and locations to safeguard. Any accidental authentication over plain HTTP will compromise the secret. HMAC-based authentication (client_secret_jwt) mitigates this risk of shared secrets.
Asymmetric key authentication (private_key_jwt and the mTLS tls_client_auth and self_signed_tls_client_auth methods) relies on a private key, which clients have the option to store in a secure module to prevent its extraction. The use of asymmetric key authentication frees the server from having to hold any sensitive credentials.
8.3.1. Recommended client authentication methods
Based on a private key and offering high security properties.
| Method | Description |
|---|---|
| private_key_jwt | The client authenticates with a JWT signed with a private key, such as RSA or EC, which public part is registered with the authorisation server. |
| tls_client_auth | The client authenticates with a client X.509 certificate issued from a certificate authority trusted by the authorisation server. |
| self_signed_tls_client_auth | The client authenticates with a self-signed client X.509 certificate. |
8.3.2 Other client authentication methods
Based on a shared key, offer weak security.
| Method | Description |
|---|---|
| client_secret_basic | Basic authentication with a shared secret (password). Weak security properties. |
| client_secret_post | A variant of basic authentication where the credentials are posted as form parameters instead of passed in the Authorization header. Weak security properties. |
| client_secret_jwt | The client authenticates with an HMAC-secured JWT using the client secret as key. Prevents leakage of the secret and limits the time-window for replay if the request is accidentally sent over unsecured HTTP. |
8.4. Authorisation server endpoints
| Core endpoints | Optional endpoints |
|---|---|
8.4.1 Authorisation endpoint
This is the server endpoint where the user gets authenticated and authorisation is granted to the requesting client in the authorisation code flow (grant). The other OAuth grants don’t involve this endpoint, but typically the token enpoint.
This is also the only endpoint which serves requests via the front-channel (the browser) and facilitates user interaction.
8.4.2 Token endpoint
As the name implies, this is the endpoint for obtaining the access token. For those grants that require user interaction (code and the obsolete password, but not implicit, which returns the token in the front-channel), the server may also issue a refresh token, subject to server policy.
If the client is confidential it is required to authenticate at the token endpoint.
8.4.3 Optional endpoints
An authorisation servers can have these additional endpoints:
-
Server metadata – JSON document publishing the server endpoint URLs and its OAuth 2.0 features and capabilities. Clients use this information to configure their requests to the server.
-
Server JWK set – JSON document with the server’s public keys (typically RSA or EC) in JSON Web Key (JWK) format. These keys may be used to secure issued JWT-encoded access tokens and other objects.
-
Client registration – RESTful web API for registering clients with the authorisation server. Registration may be protected (require pre-authorisation) or open (public). The endpoint can be enhanced to support client read, update and delete operations.
-
Pushed authorisation request (PAR) – enables clients to POST the payload of an authorisation request directly to the server, the resulting handle can then be used at the authorisation endpoint to complete the request. With PAR clients can be authenticated upfront (before the user interaction) and the authorisation request parameters receive integrity and confidentiality protection.
-
Token introspection – For letting resource servers validate identifier-based access tokens. May also be used to validate self-contained access tokens.
-
Token revocation – For letting clients notify the authorisation server that a previously obtained refresh or access token is no longer needed. Note this endpoint isn’t intended for revoking access for an end-user or client; that will require a custom API.
9. FAQ

9.1 What is the relation of OpenID Connect to OAuth 2.0?
OpenID Connect is a concrete protocol for authenticating users, devised on top of the OAuth 2.0 framework. As such OpenID Connect is also often called a profile of OAuth 2.0.
Do not use plain OAuth to autenticate users! OpenID Connect is designed specifically for this purpose.
OpenID Connect introduces a new token, called ID token, to assert the user’s identity and the authentication event.
The access token is still used. It facilitates retrieval of consented profile details (called claims or attributes) from the UserInfo endpoint of the OpenID provider.
9.2 What other OAuth 2.0 profiles exist?
The community around the OpenID Foundation is developing other concrete profiles besides OpenID Connect, carefully vetted by experts, to provide token-based security for a particular industry or application domain:
-
FAPI – High-security profile for financial-grade applications, used in Open Banking and PSD2 implementations.
-
HEART – Profile for letting individuals control access to their health-related data.
-
MODRNA – For mobile network operators providing identity services to relying parties.
-
EAP – Security and privacy profile integrating token binding and FIDO.
-
iGOV – For authenticating and sharing consented data with public sector services across the globe.