OpenID Connect explained
OpenID Connect has become the leading standard for single sign-on and identity provision on the Internet. Its formula for success: simple JSON-based identity tokens (JWT), delivered via OAuth 2.0 flows that fit web, browser-based and native / mobile applications.
1. Local user authentication vs Identity Providers

Applications often need to authenticate their users. The simplistic approach is to set up a local database for the users’ accounts and credentials. Given enough technical care this can be made to work well. However, local authentication can be bad for business:
-
People find account creation tedious, and rightly so. This can cause consumer sites and apps to suffer abandoned shopping cards, and hence loss of business and sales.
-
For enterprises with a multitude of apps, the maintenance of separate user databases can easily turn into an administrative and security nightmare. You may want to put your IT resources to better use.
The established solution to these problems is to delegate user authentication and provisioning to a dedicated, purpose-built service, called an Identity Provider (IdP).
Google, Facebook and Twitter, where many people have accounts, offer such IdP services for their users. A consumer web site can greatly streamline its user onboarding by integrating login with those IdPs.
In a enterprise, this would ideally be one internal IdP service, for employees and contractors to log into the internal applications. A central login has considerable benefits, such as easier administration and faster development of new apps. You may ask: Isn’t that going to create a single point of failure? No, not when the IdP service is built for redundancy.
2. Enter OpenID Connect

OpenID Connect, published in 2014, is not the first standard for identity provision, but definitely the best in terms of usability and simplicity, having learned lessons from past efforts such as SAML and OpenID 1.0 and 2.0.
What is the formula for success of OpenID Connect?
-
Easy to consume identity tokens: Clients receive the user’s identity encoded in a secure JSON Web Token (JWT), called an ID token. JWTs are appreciated for their elegance and portability, and for their ready support for a wide range of signature and encryption algorithms. All that makes JWT outstanding for the ID token job.
-
Based on the OAuth 2.0 framework: The ID token is obtained via a standard OAuth 2.0 flow, with flows available for web as well as native / mobile apps. OAuth 2.0 also means having one protocol for authentication and authorisation (obtaining access tokens).
-
Simplicity: OpenID Connect is simple enough to integrate with basic apps, but it also has the features and security options to satisfy complex requirements of enterprises, fintechs and governments.
3. The ID token

The ID token resembles the concept of an identity card, in a standard JWT format, signed by the OpenID Provider (OP). To obtain one the client needs to send the user to their OP with an authentication request.
Features of the ID token:
- Asserts the identity of the user, called subject in OpenID (sub).
- Specifies the issuing authority (iss).
- Is generated for a particular audience, i.e. client (aud).
- May contain a nonce (nonce).
- May specify when (auth_time) and how, in terms of strength (acr), the user was authenticated.
- Has an issue (iat) and expiration time (exp).
- May include additional requested details about the subject, such as name and email address.
- Is digitally signed, so it can be verified by the intended recipient.
- May optionally be encrypted for confidentiality.
The ID token statements, or claims, are packaged in a simple JSON object:
{
  "sub"       : "alice",
  "iss"       : "https://openid.c2id.com",
  "aud"       : "client-12345",
  "nonce"     : "n-0S6_WzA2Mj",
  "auth_time" : 1311280969,
  "acr"       : "https://load.c2id.com/high",
  "iat"       : 1311280970,
  "exp"       : 1311281970
}
The ID token header, claims JSON and signature are encoded into a base 64 URL-safe string:
eyJhbGciOiJSUzI1NiIsImtpZCI6IjFlOWdkazcifQ.ewogImlzcyI6ICJodHRw
Oi8vc2VydmVyLmV4YW1wbGUuY29tIiwKICJzdWIiOiAiMjQ4Mjg5NzYxMDAxIiw
KICJhdWQiOiAiczZCaGRSa3F0MyIsCiAibm9uY2UiOiAibi0wUzZfV3pBMk1qIi
wKICJleHAiOiAxMzExMjgxOTcwLAogImlhdCI6IDEzMTEyODA5NzAKfQ.ggW8hZ
1EuVLuxNuuIJKX_V8a_OMXzR0EHR9R6jgdqrOOF4daGU96Sr_P6qJp6IcmD3HP9
9Obi1PRs-cwh3LO-p146waJ8IhehcwL7F09JdijmBqkvPeB2T9CJNqeGpe-gccM
g4vfKjkM8FcGvnzZUN4_KSP0aAp1tOJ1zZwgjxqGByKHiOtX7TpdQyHE5lcMiKP
XfEIQILVq0pc_E2DzL7emopWoaoZTF_m0_N0YzFC6g6EJbOEoRoSK5hoDalrcvR
YLSrQAZZKflyuVCyixEoV9GfNQC3_osjzw2PAithfubEEBLuVVk4XUVrWOLrLl0
nx7RkKU8NXNHq-rvKMzqg
You can read more about the JWT data structure and its encoding in RFC 7519.
4. How to request an ID token

Now that we know what an ID token is, how can a client, called Relying Party (RP) in OpenID Connect, request one?
Authentication must take place at the identity provider, where the user’s session or credentials will be checked. For that a trusted agent is required, and this role is usually performed by the web browser.
A browser popup is the preferred way for a web application to redirect the user to the IdP. Mobile apps on platforms such as Android or iOS should launch the system browser for that purpose. Embedded web views are not be trusted, as there is nothing to prevent the app from snooping on the user password. User authentication must always occur in a trusted context that is separate from the app (e.g. the browser).
Note that OpenID Connect doesn’t specify how users should actually be authenticated, this is left up to the IdP to decide.
ID tokens are requested via the OAuth 2.0 protocol, which has been a tremendous success on its own. OAuth was originally devised as a simple authorisation mechanism for apps to obtain access tokens for web APIs or other protected resources. It has flows designed for all application types: traditional server-based web applications, browser (JavaScript) only apps, and native / mobile apps.
So what are those flows, or paths, for obtaining ID tokens?
-
Authorisation code flow – the most commonly used flow, intended for traditional web apps as well as native / mobile apps. Involves an initial browser redirection to / from the OP for user authentication and consent, then a second back-channel request to retrieve the ID token. This flow offers optimal security, as tokens are not exposed to the browser and the client can also be authenticated.
-
Implicit flow – for browser (JavaScript) based apps that don’t have a backend. The ID token is received directly with the redirection response from the OP. No back-channel request is required here.
-
Hybrid flow – rarely used, allows the application front-end and back-end to receive tokens separately from one another. Essentially a combination of the code and implicit flows.
The OpenID Connect spec provides a nice comparison of the three flows, reproduced here in a simplified form.
| Flow property | Code | Implicit | Hybrid |
|---|---|---|---|
| Browser redirection step | ✔ | ✔ | ✔ |
| Backend request step | ✔ | ✕ | ✔ |
| Tokens revealed to browser | ✕ | ✔ | ✔ |
| Client can be authenticated | ✔ | ✕ | ✔ |
5. Cool ID token uses

An ID token can be put to uses beyond basic sign-in:
-
Stateless sessions – Put into a browser cookie the ID token can implement a lightweight stateless session. This does away with the need to store sessions on the server side (in memory or on disk), which can be a burden to manage and scale. The session is checked by validating the ID token. When the token reaches some predefined age past its issue timestamp (iat) the application can simply ask the OP for a new one via a silent prompt=none request.
-
Passing identity to 3rd parties – The ID token may be passed to other application components or to backend services when knowledge of the user’s identity is required, for example to log audit trails.
-
Token exchange – The ID token may be exchanged for an access token at the token endpoint of an OAuth 2.0 authorisation server (RFC 8693). There are real world scenarios when an identity document is required to obtain access, for example when you check in at a hotel to get your room key. Token exchange has uses in distributed and enterprise applications.
6. Example OpenID authentication

We will now go through a minimal example of how to obtain an ID token for a user from an OP, using the authorisation code flow. This is the most commonly used flow by traditional web applications. Examples of the implicit and hybrid flow can be found in the OpenID Connect spec.
The code flow has two steps:
| Step 1 | Step 2 | |
|---|---|---|
| Purpose |
1. Authenticate user 2. Receive user consent |
1. Authenticate client (optional) 2. Exchange code for token(s) |
| Via | Front-channel request (browser redirection) |
Back-channel request (app to web server) |
| To | Authorisation endpoint | Token endpoint |
| Result on success | Authorisation code (step 2 input) |
ID token (+ OAuth 2.0 access token) |
Code flow: Step 1
The RP initiates user authentication by redirecting the browser to the
OAuth 2.0 authorisation endpoint
of the OpenID Provider. The OpenID authentication request
is essentially an OAuth 2.0 authorisation request
to access the user’s identity, indicated by an openid value in the scope
parameter.
Example authentication redirection to the OP:
HTTP/1.1 302 Found
Location: https://openid.c2id.com/login?
          response_type=code
          &scope=openid
          &client_id=s6BhdRkqt3
          &state=af0ifjsldkj
          &redirect_uri=https%3A%2F%2Fclient.example.org%2Fcb
The request parameters are encoded in the URI query:
-
response_type Set to
codeto indicate an authorisation code flow. -
scope Used to specify the scope of the requested authorisation in OAuth. The scope value
openidsignals a request for OpenID authentication and ID token. -
client_id The client identifier of the RP at the OP. This identifier is assigned when the RP is registered with the OP, via the client registration API, a developer console, or some other method.
-
state Opaque value set by the RP to maintain state between request and callback.
-
redirect_uri The RP callback URI for the authentication response.
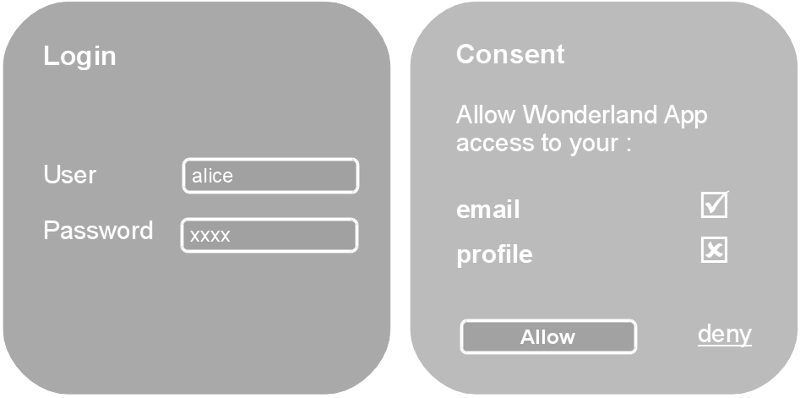
At the OP, the user will typically be authenticated by checking if they have a valid session (established by a browser cookie), and in the absence of that, by prompting the user to login. After that the user will typically be asked whether they agree to sign into the RP.
The OP will then call the client redirect_uri with an authorisation code (on
success) or an error code (if access was denied, or some other error occurred,
such a malformed request was detected).
HTTP/1.1 302 Found
Location: https://client.example.org/cb?
          code=SplxlOBeZQQYbYS6WxSbIA
          &state=af0ifjsldkj
The RP must validate the state parameter, and use the code to proceed to
the next step - exchanging the code for the
ID token.
Code flow: Step 2
The authorisation code is an intermediate credential, which encodes the authorisation obtained at step 1. It is therefore opaque to the RP and only has meaning to the OP server. To retrieve the ID token the RP must submit the code to the OP, but this time with a direct back-channel request. This is done for two reasons:
- To authenticate confidential clients with the OP before revealing the tokens;
- To deliver the tokens straight to the RP, thus avoid exposing them to the browser.
The code-for-token exchange happens at the token endpoint of the OP:
POST /token HTTP/1.1
Host: openid.c2id.com
Content-Type: application/x-www-form-urlencoded
Authorization: Basic czZCaGRSa3F0MzpnWDFmQmF0M2JW

grant_type=authorization_code
 &code=SplxlOBeZQQYbYS6WxSbIA
 &redirect_uri=https%3A%2F%2Fclient.example.org%2Fcb
The client ID and secret are passed via the Authorization header. Apart from
HTTP basic authentication
OpenID Connect also supports authentication with a
JWT, which doesn’t expose the client
credentials with the token request, has expiration, and thus provides stronger
security.
The token request parameters are form-encoded:
-
grant_type Set to
authorization_code. -
code The code obtained from step 1.
-
redirect_uri Repeats the callback URI from step 1.
On success the OP will return a JSON object with the ID token, an access token and an optional refresh token:
HTTP/1.1 200 OK
Content-Type: application/json
Cache-Control: no-store
Pragma: no-cache

{
  "id_token": "eyJhbGciOiJSUzI1NiIsImtpZCI6IjFlOWdkazcifQ.ewogImlzc
    yI6ICJodHRwOi8vc2VydmVyLmV4YW1wbGUuY29tIiwKICJzdWIiOiAiMjQ4Mjg5
    NzYxMDAxIiwKICJhdWQiOiAiczZCaGRSa3F0MyIsCiAibm9uY2UiOiAibi0wUzZ
    fV3pBMk1qIiwKICJleHAiOiAxMzExMjgxOTcwLAogImlhdCI6IDEzMTEyODA5Nz
    AKfQ.ggW8hZ1EuVLuxNuuIJKX_V8a_OMXzR0EHR9R6jgdqrOOF4daGU96Sr_P6q
    Jp6IcmD3HP99Obi1PRs-cwh3LO-p146waJ8IhehcwL7F09JdijmBqkvPeB2T9CJ
    NqeGpe-gccMg4vfKjkM8FcGvnzZUN4_KSP0aAp1tOJ1zZwgjxqGByKHiOtX7Tpd
    QyHE5lcMiKPXfEIQILVq0pc_E2DzL7emopWoaoZTF_m0_N0YzFC6g6EJbOEoRoS
    K5hoDalrcvRYLSrQAZZKflyuVCyixEoV9GfNQC3_osjzw2PAithfubEEBLuVVk4
    XUVrWOLrLl0nx7RkKU8NXNHq-rvKMzqg"
  "access_token": "SlAV32hkKG",
  "token_type": "Bearer",
  "expires_in": 3600,
}
The ID token is a JWT and must be properly validated by the RP before it can be accepted.
Note that a bearer access token is also included. This is to ensure the token response is compliant with the OAuth 2.0 spec. For basic OpenID authentication requests where only an ID token is requested this access token is nominal and may be safely ignored. The access token however comes into play when also requesting access to user profile data at the UserInfo endpoint. More on this in the next chapter.
7. Claims (user info)

OpenID Connect specifies a set of standard claims, or user attributes. They are intended to supply the client with consented user details such as email, name and picture, upon request. Language tags enable localisation.
| Scope value | Associated claims |
|---|---|
| email, email_verified | |
| phone | phone_number, phone_number_verified |
| profile | name, family_name, given_name, middle_name, nickname, preferred_username, profile, picture, website, gender, birthdate, zoneinfo, locale, updated_at |
| address | address |
Clients can request claims in two ways:
- An entire claims category by its
scopevalue (see the above table for the scope value to claim mappings) - Individually, with the optional claims request parameter.
Example request to access the user’s identity (ID token) and email, by simply
setting the scope to openid email:
HTTP/1.1 302 Found
Location: https://openid.c2id.com/login?
          response_type=code
          &scope=openid%20email
          &client_id=s6BhdRkqt3
          &state=af0ifjsldkj
          &redirect_uri=https%3A%2F%2Fclient.example.org%2Fcb
If you’re an application developer, respect the user’s privacy and keep the requested claims down to the very essential. This will increase your chances of user conversion and will also ensure compliance with recent privacy laws.
Note that even if a user allows an application to access their identity, they may choose to deny release of some claims. The application should be able to handle such decisions gracefully.
The claims format is JSON:
{
   "sub"                     : "alice",
   "email"                   : "alice@wonderland.net",
   "email_verified"          : true,
   "name"                    : "Alice Adams",
   "given_name"              : "Alice",
   "family_name"             : "Adams",
   "phone_number"            : "+359 (99) 100200305",
   "profile"                 : "https://c2id.com/users/alice",
   "https://c2id.com/groups" : [ "audit", "admin" ]
}
OpenID providers may extend the standard JSON claims schema to include additional attributes. Enterprises may for instance define claims such as employee role, manager, and department. The names of any additional claims should be prefixed by a URL to create a safe namespace for them and prevent collisions.
8. OpenID Connect provider endpoints

| Core endpoints | Optional endpoints |
|---|---|
8.1 Authorisation endpoint
This is the OP server endpoint where the user is asked to authenticate and grant the client access to the user’s identity (ID token) and potentially other requested details, such as email and name (called UserInfo claims).
This is the only standard endpoint where users interact with the OP, via a user agent, which role is typically assumed by a web browser.
8.2 Token endpoint
The token endpoint lets the client appf exchange the code received from the authorisation endpoint for an ID token and access token. If the client is confidential it will be required to authenticate at the token endpoint.
The token endpoint it may also accept other OAuth 2.0 grant types to issue tokens, for example:
8.3 UserInfo endpoint
The UserInfo endpoint returns previously consented user profile information to the client. A valid access token is required for that.
GET /userinfo HTTP/1.1
Host: openid.c2id.com
Authorization: Bearer sa7Aebo6Ookoo0oh
The UserInfo is JSON encoded and may optionally be packaged as a JWT that is signed or encrypted.
HTTP/1.1 200 OK
Content-Type: application/json

{
  "sub"            : "alice",
  "email"          : "alice@wonderland.net",
  "email_verified" : true,
  "name"           : "Alice Adams",
  "picture"        : "https://c2id.com/users/alice.jpg"
}
8.4 Optional endpoints
OpenID Connect providers can have these additional endpoints:
-
WebFinger – Enables dynamic discovery of the OpenID Connect provider for a given user, based on their email address or some other detail.
-
Provider metadata – JSON document listing the OP endpoint URLs and the OpenID Connect / OAuth 2.0 features it supports. Clients can use this information to configure their requests to the OP.
-
Provider JWK set – JSON document containing the provider’s public keys (typically RSA) in JSON Web Key (JWK) format. These keys are used to secure the issued ID tokens and other artifacts.
-
Client registration – RESTful web API for registering client apps with the OP. Registration may be protected (require pre-authorisation) or open (public).
-
Session management – Enables client apps to check if a logged in user has still an active session with the OpenID Connect provider. Also to facilitate logout.
9. Where is the spec?

The standard was produced by a working group at the OpenID foundation and comprises a set of documents which can be explored at http://openid.net/connect/.
10. FAQ

10.1 How is OpenID Connect related to OAuth 2.0?
OAuth 2.0 is a framework for obtaining access tokens for protected resources such as web APIs. OpenID Connect utilises the OAuth 2.0 semantics and flows to allow clients (relying parties) to access the user’s identity, encoded in a JSON Web Token (JWT) called ID token. The access token facilitates retrieval of consented profile details (called claims or attributes) from the UserInfo endpoint of the OpenID provider.
10.2 How do OpenID providers authenticate users?
OpenID Connect leaves this entirely up to the particular IdP. Implementors may use any method for authenticating users, or combine two methods for stronger security (2FA).
- Username / password
- Hardware tokens
- SMS confirmation
- Biometrics
- Etc.
The IdP may set the optional acr and amr claims in the ID
token to inform the client how the user has been authenticated.
Clients are also have control over authentication:
-
The optional
prompt=loginparameter will cause the user to be (re)authenticated, even if they have a valid session (cookie) with the IdP. -
With IdPs that support various authentication strengths, the application may request stronger authentication using the optional
acr_valuesparameter.
10.3 What is a bearer access token?
The access token resembles the concept of a physical token or ticket. It gives the holder access to a specific HTTP resource or web service, which is typically limited by scope and has an expiration time.
Bearer access tokens are easy to use - whoever has one is permitted to call the protected resource. For that reason they must always be passed around over a secure channel (TLS / HTTPS) and stored securely.
OpenID Connect employs OAuth 2.0 access tokens to allow client apps to retrieve consented user information from the UserInfo endpoint.
An OpenID provider may extend the access token scope to other protected resources and web APIs.
Presentations