How to integrate a login UI and auth factors with a Connect2id server
This is a guide for integrators and frontend developers how to bind a login page (UI) as as well as one or more user authentication factors to a Connect2id server.
The Connect2id server provides a powerful web API for binding a login UI, auth factors and consent policy
The login flow and user interaction
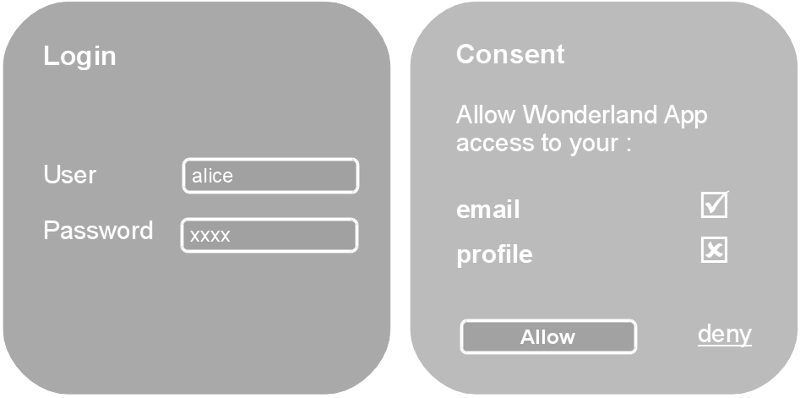
Let’s imagine we have a user, Alice, who wants to log into Wonderland App and do so with OpenID Connect.
The app, which can be web-based or mobile, sends Alice’s browser to her Identity Provider (IdP). There she typically gets presented with a screen to enter her credentials in order to get authenticated with the IdP, and then another to confirm that she actually wants to login into Wonderland App, and possibly permit access to some profile information. If consent for login is granted, the IdP redirects the browser back to Wonderland App with a response, which allows the app to receive an ID token for Alice, and also access the profile information for which it has been authorised.
An IdP must always go through these two steps - authenticate the user, and obtain consent. User interaction, that is Alice’s input, may not always be required at each step though.
For example, once Alice is authenticated with the IdP, the IdP can install a session cookie in her browser, and spare her from having to enter her credentials every time she passes through the IdP. The IdP authentication screen can be skipped then (until the session expires).
The consent screen may also get skipped, if Alice lets her decision to log into Wonderland App to be remembered, until explicitly revoked. Or this may be a general policy of the IdP, for all or selected apps.
The authorisation session web API
The interaction between Alice and the IdP happens at what the OAuth 2.0 protocol calls the authorisation endpoint, because that’s where the end-user allows the app access to her identity and profile information (which also implies that user gets authenticated there).
Instead of hard-wiring some authentication and consent UI into the Connect2id server for the authorisation endpoint, we at Connect2id decided to decouple this functionality via a web API called the authorisation session web API.
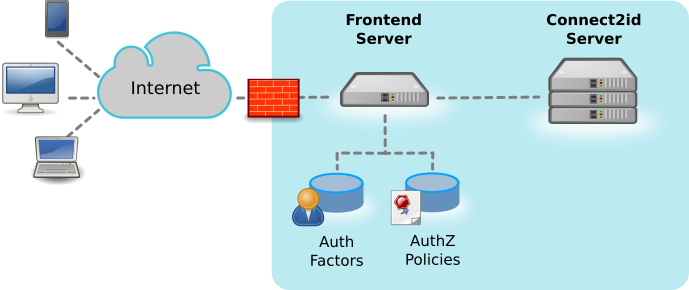
All user interaction, including the low-level authentication of Alice (calling LDAP servers, OTP, etc) and obtaining her consent, is handled outside the Connect2id server. Enterprises and system integrators derive a number of benefits from this novel web API approach. Here are some of them:
-
Any type of new or existing auth factors, schemas and policies can be quickly and efficiently integrated.
-
Frontend developers can stick to their preferred language and framework, and reuse existing code and assets. Branded, personalised and otherwise tailored UX can be created. For example, separate logins for each type of audience (e.g. employees, consumers) and device (PC, mobile).
-
The frontend can be hosted independently from the Connect2id server, and employ an HA proxy and CDN if needed. Zero IdP downtime is required for updates to the frontend.
-
End-user credentials need not be disclosed with the Connect2id server, which is good for overall security.
The frontend’s interaction with the authorisation session API resembles the MVC pattern. The frontend is expected to pass each OpenID request from a client app to the Connect2id server for processing, and then if prompted by the server, interact with the end-user to perform the above mentioned tasks:
-
(Re)authenticate the user. The Connect2id server will typically ask the frontend to do this if no valid session cookie was found for the user, or the app needs the authentication strength (ACR) to be stepped up. The frontend may handle this task for example by rendering a screen where Alice can enter her credentials, and then checking them with a backend LDAP directory. On success the frontend submits the resolved user ID to the Connect2id server.
-
Get the end-user’s consent for the requested OAuth 2.0 scope values and OpenID Connect claims. This interaction is needed if the Connect2id server has no previous consent for Alice and the requesting app on record. The frontend can obtain the consent directly from Alice, e.g. by presenting a form (explicit consent), or call upon some policy for that.
Finally, when Alice’s identity and consent are established, the Connect2id generates the appropriate OpenID response, for the frontend to relay back to the requesting client.
Registering the login page
In order for the login page to be recognised as the OAuth 2.0 authorisation endpoint of the Connect2id server, it must be registered. This is done by simply setting its URL in the op.authz.endpoint configuration:
op.authz.endpoint = https://myidp.com/openid
This will enable the Connect2id server to advertise its OAuth 2.0 authorisation endpoint in the JSON document for clients and developers to discover its endpoints and capabilities:
https://[base-server-url]/.well-known/openid-configuration
General implementation guidelines
General guidelines for the login / consent page:
-
As already mentioned, the login page can be implemented with any language and framework, for example Java with AngularJS. C#, PHP, NodeJS, RoR, etc will work too. If it’s written with Java, the login page may be hosted inside the servlet container of the Connect2id server.
-
The login page must be able to access the authorisation session web API, and for that it must have the appropriate API key, to be passed in the
Authorizationheader of each request as a simple bearer token. The API key must be kept secret and secure by the login page. -
All requests to the authorisation session web API must be made from the server-side of the login page.
-
The login page can be implemented as a stateless single-page web app.
-
Very often the login page may need to keep some information about the user between OpenID requests. The login page may store this data in the IdP session that the Connect2id server creates for each user.
How to use the authorisation session web API
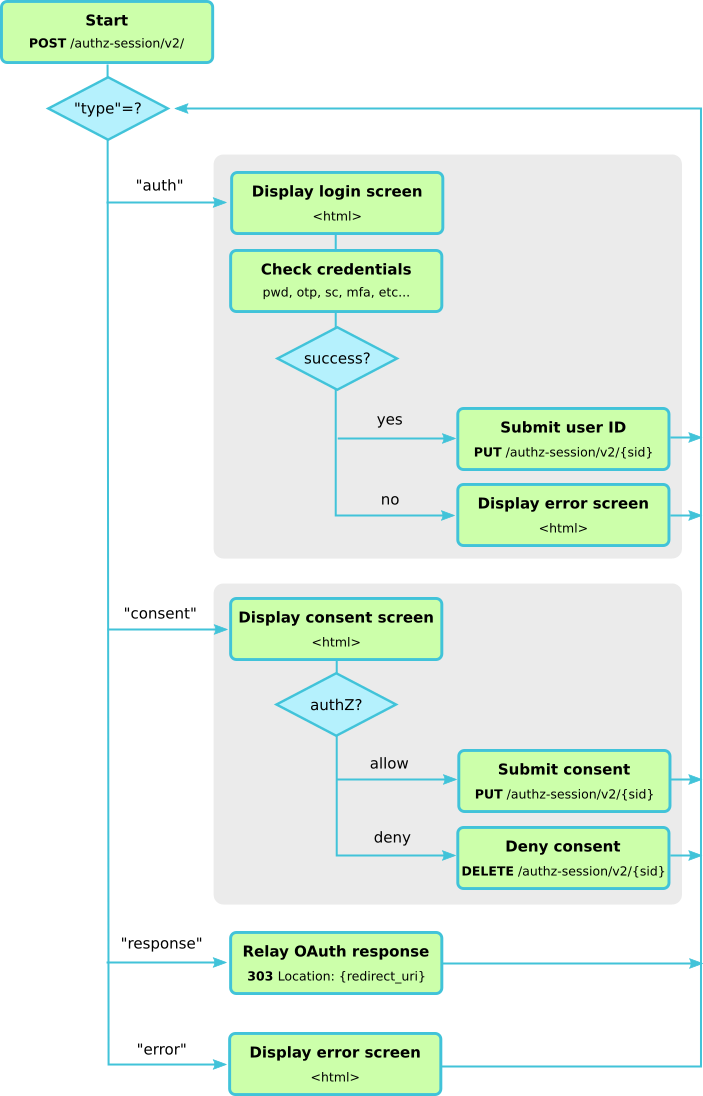
The following diagram outlines the usage of the authorisation session API and how the Connect2id server walks the login page through the steps of authenticating the user and obtaining her consent, if necessary, in order to provide the final OpenID response to be send back to the client app.
Step 1. Submit OpenID request and session ID to Connect2id server
Upon receiving an OpenID authentication request the login page must submit it to the Connect2id server, along with the session cookie value (if any).
In order to do that, simply extract the URL query string and the session cookie (if one is present) from the received HTTP request. With these two parameters let the login page start a new authorisation session with the Connect2id server.
Example OpenID authentication request:
https://c2id.com/login?response_type=code&client_id=123&redirect_uri=https%3A%2F%2Fclient.example.com%2Fcb&scope=openid+email&state=KEbMte3qrtNau8C7PsU1VLxd674BQfjKCARDFR1JWnE&display=popup
The extracted query string:
response_type=code&client_id=123&redirect_uri=https%3A%2F%2Fclient.example.com%2Fcb&scope=openid+email&state=KEbMte3qrtNau8C7PsU1VLxd674BQfjKCARDFR1JWnE&display=popup
Submitting the query string, together with the session cookie (if any) to the Connect2id server, so it can begin processing the OpenID authentication request:
POST /authz-sessions/rest/v3/ HTTP/1.1
Host: c2id.com
Authorization: Bearer ztucZS1ZyFKgh0tUEruUtiSTXhnexmd6
Content-Type: application/json

{
  "query"   : "response_type=code&client_id=123&redirect_uri=https%3A%2F%2Fclient.example.com%2Fcb&scope=openid+email&state=KEbMte3qrtNau8C7PsU1VLxd674BQfjKCARDFR1JWnE&display=popup",
  "sub_sid" : "9yLXidrzk91r3BCpJeF1Vrf_aza4oNe-EdNkaXBa1iw"
}
The Connect2id server will immediately begin processing the OpenID Connect request. With that we proceed to the next step.
Step 2. React to the Connect2id server’s response
The Connect2id server returns a JSON object indicating the next action that is required from the login page. This depends on the value of the type member of the JSON object:
-
auth – if type is set to this value, proceed to step 3.
-
consent – proceed to step 4
-
response – proceed to step 5
-
error – proceed to step 6
Step 3. Authenticate the user
The Connect2id server asks the login page to authenticate the present user with a JSON message like this:
{
  "type"           : "auth",
  "sid"            : "g6f5K6Kf6EY11zC00errCf64yLtg9lLANAcnXQk2xUE",
  "display"        : "popup",
  "select_account" : false
}
The sid indicates the ID of the authorisation session created in the previous
step, and will be needed in subsequent requests from the login page to the API.
The display parameter is a hint to the login page how the UI should be
rendered. You can look up the possible display values in the core OpenID
Connect spec.
Make sure your UI is responsive to support a wide range of screen resolutions.
The select_account parameter is optional, in most cases it won’t be set. If
true it indicates a request from the client app for the user to select
another account for her at the IdP.
The JSON message that prompts the login page to authenticate the user is described in detail in the authorisation session API reference.
How should the login page proceed with authenticating the user? This is up to the IdP’s policy and available infrastructure. The login page may for instance render a screen for the user to input her credentials, and check them with an MS-AD/LDAP directory. This may also involve an additional factor, such as a hardware token, or a code sent to the user’s smart phone.
If the Connect2id server is configured
for multiple authentication levels (ACRs), clients may specify the desired
level in the OpenID request. This may be requested for all logins into a given
client app, or just for sensitive operations that need a higher-level of
assurance (e.g. making a payment). Either way, this will be indicated by the
presence of an acr parameter in the authentication
prompt.
If the user is successfully authenticated, the login page must submit her ID to the Connect2id server, using the JSON object format described here:
PUT /authz-sessions/rest/v3/g6f5K6Kf6EY11zC00errCf64yLtg9lLANAcnXQk2xUE HTTP/1.1
Host: c2id.com
Authorization: Bearer ztucZS1ZyFKgh0tUEruUtiSTXhnexmd6
Content-Type: application/json

{
  "sub" : "alice"
}
Note this is done by an HTTP PUT to the authorisation session ID obtained above.
If the IdP supports the notion of multiple auth levels (ACRs), indicate the level at which the user was just authenticated:
PUT /authz-sessions/rest/v3/g6f5K6Kf6EY11zC00errCf64yLtg9lLANAcnXQk2xUE HTTP/1.1
Host: c2id.com
Authorization: Bearer ztucZS1ZyFKgh0tUEruUtiSTXhnexmd6
Content-Type: application/json

{
  "sub" : "alice",
  "acr" : "http://loa.c2id.com/high"
}
At this point the login page can also supply various settings, or override defaults, for the user session that the Connect2id server is going to create for Alice once it has received her identity.
For example, let’s make the max idle time of her browser session with the IdP one week (60 x 24 x 7 = 10080 minutes), and also save her name and email address with the session, so the login page can greet her when she comes back to the IdP for another OpenID Connect login to a client app:
PUT /authz-sessions/rest/v3/g6f5K6Kf6EY11zC00errCf64yLtg9lLANAcnXQk2xUE HTTP/1.1
Host: c2id.com
Authorization: Bearer ztucZS1ZyFKgh0tUEruUtiSTXhnexmd6
Content-Type: application/json

{
  "sub"      : "alice",
  "acr"      : "http://loa.c2id.com/high",
  "max_idle" : 10080,
  "data"     : { "name"  : "Alice Adams",
                 "email" : "alice@wonderland.net" }
}
Once the user authentication and session details are PUT, go to step 2 again.
Step 4. Obtain the user’s consent
If the POST response at step 2 is a consent prompt this means that the login page must render a screen to get the user’s confirmation to log into the client app, and if also requested by the client app, authorise access to profile information, etc.
Here is an example consent prompt produced by the Connect2id server:
HTTP/1.1 200 OK
Content-Type: application/json

{
  "type"        : "consent",
  "sid"         : "g6f5K6Kf6EY11zC00errCf64yLtg9lLANAcnXQk2xUE",
  "display"     : "popup",
  "sub_session" : { "sid"           : "9yLXidrzk91r3BCpJeF1Vrf_aza4oNe-EdNkaXBa1iw",
                    "sub"           : "alice",
                    "auth_time"     : 12345678,
                    "creation_time" : 12345678,
                    "acr"           : "http://loa.c2id.com/high",
                    "max_life"      : 302400,
                    "auth_life"     : 20160,
                    "max_idle"      : 10080,
                    "data"          : { "name"  : "Alice Adams",
                                        "email" : "alice@wonderland.net" }},
  "client"      : { "client_id"        : "8cc2043",
                    "client_type"      : "confidential",
                    "application_type" : "web",
                    "name"             : "Wonderland App",
                    "uri"              : "http://wonderland.com"},
  "scope"       : { "new"       : [ "openid", "email" ],
                    "consented" : [ ] },
  "claims"      : { "new"       : { "essential" : [ "email", "email_verified" ],
                                    "voluntary" : [ ] },
                    "consented" : { "essential" : [ ],
                                    "voluntary" : [ ] } }
}
Note that we have again a sid and a display parameter included (see step
3 for their meaning).
The Connect2id server also included the details of the
session that Alice has at the
IdP after her authentication (sub_session for subject session).
Make sure you take sub_session.sid to create / update the session cookie for
the browser, so next time Alice comes to login she has a valid session (see
step 1). You can use the sub_session.max_idle to set the
cookie expiration, or just make the cookie permanent, and let the Connect2id
server to expire the session. The sub_session.data can be used to personalise
the UI.
The registered details for the client app are
also included (client), so the frontend can render its name, details and
icon. The registered client details can also be used to control consent, so you
may for instance prohibit certain clients from receiving tokens with with
privileged scope.
Finally, the scope and claims parameters list the OAuth 2.0 scope values
and any OpenID Connect claims
that are requested by the client app. These are subdivided into scope values /
claims for which the Connect2id server already has Alice’s consent on record,
and those which are requested for the first time. The claims have another
subdivision, essential vs voluntary claims, according to OpenID Connect
semantics.
Now that we’ve interpreted the consent prompt, how should it be handled?
This is up to chosen policy of the IdP. The approval of requested scope and claims may be explicit (rendering a form for Alice to input her choice), implicit (letting an IdP rule take over), or a combination of both.
Regardless of how the approval happens, the login page should in the end submit the consented scope values and claim names to the Connect2id server, so it can complete the request and issue the appropriate ID token, access token, etc.
This is done by a simple PUT to the authorisation session, listing the authorised scope and claims:
PUT /authz-sessions/rest/v3/g6f5K6Kf6EY11zC00errCf64yLtg9lLANAcnXQk2xUE HTTP/1.1
Host: c2id.com
Authorization: Bearer ztucZS1ZyFKgh0tUEruUtiSTXhnexmd6

{
  "scope"  : [ "openid", "email" ],
  "claims" : [ "email", "email_verified" ]
}
Note that the authorised scope and claims may exclude some of the originally requested ones (indicating they are denied), or include additional ones.
The submitted consent supports a number of options, such as overriding individual parameters of the tokens to issue, or implementing impersonation / on-behalf-of use cases.
If the Alice chooses not to login into the client app, or deny all requested
scope and claim values, the login page must
DELETE the
authorisation session, which will signal the Connect2id server to generate the
appropriate access_denied error response to be returned to the client app.
DELETE /authz-sessions/rest/v3/Vcg62csZGqGufdeth1eK1HlFqWKkVRmP3YBT5cTl7s0 HTTP/1.1
Host: c2id.com
Authorization: Bearer ztucZS1ZyFKgh0tUEruUtiSTXhnexmd6
With consent granted or denied, we proceed again to the switch in step 2.
Step 5. Relay the final response back to the client
Arriving at this step means that the Connect2id server has generated the final OpenID authentication response, which can now be returned back to the client app. The exact way how this response is to be returned depends on the particular OpenID Connect / OAuth flow employed by the client app. There are different flows to cater for each app type, such as traditional web app, browser-based app written in JavaScript, or a mobile / native app.
The login page must handle at least the query and the fragment response
modes. With these two modes just take the parameters.uri value, which
contains the encoded OpenID authentication response, and redirect the browser
to it.
Example final response:
HTTP/1.1 ok
Content-Type: application/json

{
  "type"       : "response",
  "mode"       : "query",
  "parameters" : { "uri" : "https://example.client.com/cb?code=5rZ_KxqZ&state=Nygv4CLQ" }
}
For a fragment response mode the JSON object will look similar, except that
mode will be set to fragment.
If using an HTTP status code to perform the browser redirection, make sure this
is done with a 303 code. Many redirection examples suggest the 302 code,
however the 303 code is defined unambiguously to drop the body of an HTTP
POST request. This is a security measure to prevent accidental leaking of
unintended data from the IdP to the client app (e.g. if the consent form was
submitted via HTTP POST, and the browser failed to convert the response to a
HTTP GET for the redirect).
Example 303 redirection:
HTTP/1.1 303 See Other
Location: https://client.example.com/cb?code=637FKlXTl&state=NV2kkDp
Step 6. Display error
Client apps can also make invalid OpenID requests, and in such a case the Connect2id server will output a non-redirectable error.
Compared to other authorisation errors, such as access_denied, which are
returned back to the client app, this type of error cannot or must not
cause the user’s browser to be redirected back to the client app.
The login page can however safely display it to the user, so the client’s developers may get notified of the problem.
HTTP/1.1 200 OK
Content-Type: application/json

{
  "error"             : "invalid_request",
  "error_description" : "Missing \"redirect_uri\" parameter"
}
Example login page
The Connect2id server comes with an example login page which is built with JavaScript and demonstrates the typical logic and RESTful requests that go into it.
https://bitbucket.org/connect2id/connect2id-login-page-js
Important: The login page is implemented in browser JavaScript, and must therefore only be used for testing and development purposes. Production login pages must use server-side code to implement the business logic and all web API calls to the Connect2id server.